Most of the linux servers are remotely managed by using SSH connections. OpenSSH server is the default SSH service software that comes built in with most of the linux/BSD systems. This service is also known as SSH daemon or sshd and since this service acts as the entry point for your server, it is necessary to secure the SSH service. In this guide, you will learn how to harden your OpenSSH server by using different configuration options to make sure that remote access to your server is as secure as possible.
In this first step, you will implement some initial hardening configurations to improve the overall security of your SSH server. Many of the hardening configurations for OpenSSH you implement using the standard OpenSSH server configuration file, which is located at /etc/ssh/sshd_config.

It is advisable that you back up your entire configuration file before continuing with this guide, so that you can recover it in the unlikely event that something goes wrong.
- Take a file backup with the following command:
# sudo cp /etc/ssh/sshd_config /etc/ssh/sshd_config.bak

This will save a backup copy of the file to /etc/ssh/sshd_config.bak .
- Run the following command to review the options that are currently set
# sshd -T
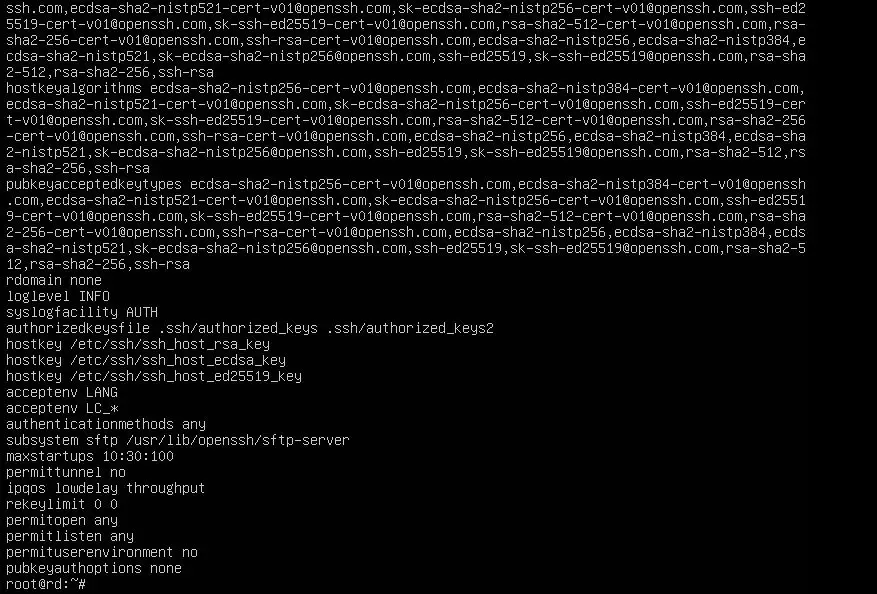
This will run OpenSSH server in extended test mode, which will validate the full configuration file and print out the effective configuration values.
- You can now open the configuration file using a text editor to begin implementing the initial hardening measures:
# vi /etc/ssh/sshd_config
- Firstly, disable logging in via SSH as the root user by setting the following option:
PermitRootLogin no
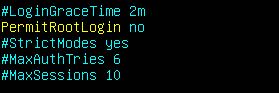
- You can limit the maximum number of authentications attempts for a particular login session by configuring the following:
MaxAuthTries 3
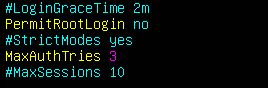
A standard value of 3 is acceptable for most setups, but you may wish to set this higher or lower depending on your own risk threshold.
- You can also set a reduced login grace period, which is the amount of time a user has to complete authentication after initially connecting to your SSH server:
LoginGraceTime 20
The configuration file specifies this value in seconds.
- If you have configured SSH keys for authentication, rather than using passwords, disable SSH password authentication to prevent leaked user passwords from allowing an attacker to log in:
PasswordAuthentication no

- You may also wish to disable authentication with empty passwords. This will prevent logins if a user’s password is set to a blank or empty value:
PermitEmptyPasswords no

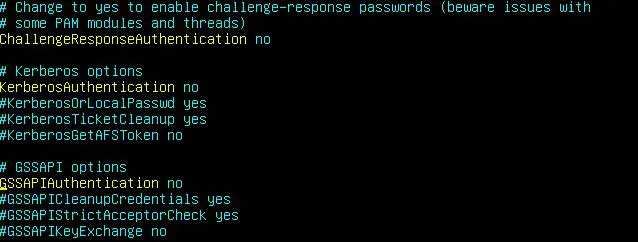
- In the majority of use cases, SSH will be configured with public key authentication as the only in-use authentication method. However, OpenSSH server also supports many other authentication methods, some of which are enabled by default. If these are not required, you can disable them to further reduce the attack surface of your SSH server:
ChallengeResponseAuthentication no
KerberosAuthentication no
GSSAPIAuthentication no
- X11 forwarding allows for the display of remote graphical applications over an SSH connection, but this is rarely used in practice. It is recommended to disable it if it isn’t needed on your server:
X11Forwarding no
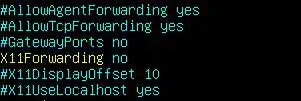
- OpenSSH server allows connecting clients to pass custom environment variables, that is, to set a $path or to configure terminal settings. However, like X11 forwarding, these are not commonly used, so can be disabled in most cases:
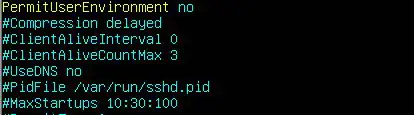
PermitUserEnvironment no
- You can disable several miscellaneous options related to tunneling and forwarding if you won’t be using these on your server:
AllowAgentForwarding no
AllowTCPForwarding no

- Finally, you can disable the verbose SSH banner that is enabled by default, as it shows various information about your system, such as the operating system version:
DebianBanner no
![]()
- Now validate the syntax of your new configuration by running sshd in test mode:
# sshd -t
![]()
If your configuration file has a valid syntax, there will be no output. In the event of a syntax error, there will be an output describing the issue.
- Once you’re satisfied with your configuration file, you can reload sshd to apply the new settings:
# service sshd reload
In this tutorial, you have completed some general hardening of your OpenSSH server configuration file. In our next tutorial, we will see how to create Access Control Lists
Latest posts by Ruwantha Nissanka (see all)
- 4 ways to hide your identity using linux - January 18, 2021
- How To Install Kali Linux in Virtualbox - December 31, 2020
- Kali Linux : The OS That Hackers Use - December 31, 2020
- How to monitor user activity in Linux with Acct - December 30, 2020
- Debsecan : You will not miss another security update - December 28, 2020