Introduction
There is a plethora of open source monitoring tools available in today. Some of these tools monitor a wide variety of metrics while some others have the capability to monitor a particular set of metrics really well. In this article, we will be setting up a monitoring tool named MRTG(Multi Router Traffic Grapher). MRTG is a free and open source monitoring tool written in perl and is used to monitor the traffic load on network links. It generates HTML pages containing PNG images which provide a LIVE visual representation of this traffic. The graphical representation of the data makes it easier to interpret and take action if needed. It helps you trace and troubleshoot network anomalies like Network traffic spikes. MRTG works with all network devices that support SNMP protocol. It monitors SNMP network devices and draws pretty pictures showing how much traffic has passed through each interface. MRTG runs on Unix/Linux, Windows and Netware systems.
Step 1: Install Prerequisites:
MRTG requires the apache web server and SNMP packages to be installed on the target server.
[root@linuxnix ~]# yum install httpd -y
Loaded plugins: fastestmirror, presto
Setting up Install Process
Loading mirror speeds from cached hostfile
* base: download.nus.edu.sg
* extras: download.nus.edu.sg
* updates: download.nus.edu.sg
No package snmp available.
No package snmpd available.
Resolving Dependencies
--> Running transaction check
---> Package httpd.x86_64 0:2.2.15-69.el6.centos will be installed
--> Finished Dependency Resolution

Dependencies Resolved

================================================================================
Package Arch Version Repository Size
================================================================================
Installing:
httpd x86_64 2.2.15-69.el6.centos base 836 k

Transaction Summary
================================================================================
Install 1 Package(s)

Total download size: 836 k
Installed size: 3.0 M
Downloading Packages:
Setting up and reading Presto delta metadata
Processing delta metadata
Package(s) data still to download: 836 k
httpd-2.2.15-69.el6.centos.x86_64.rpm | 836 kB 00:00
Running rpm_check_debug
Running Transaction Test
Transaction Test Succeeded
Running Transaction
Installing : httpd-2.2.15-69.el6.centos.x86_64 1/1
Verifying : httpd-2.2.15-69.el6.centos.x86_64 1/1

Installed:
httpd.x86_64 0:2.2.15-69.el6.centos

Complete!
[root@linuxnix ~]#

[root@linuxnix ~]# yum install net-snmp net-snmp-utils -y
Loaded plugins: fastestmirror, presto
Setting up Install Process
Loading mirror speeds from cached hostfile
* base: download.nus.edu.sg
* extras: download.nus.edu.sg
* updates: download.nus.edu.sg
Resolving Dependencies
--> Running transaction check
---> Package net-snmp.x86_64 1:5.5-60.el6 will be installed
--> Processing Dependency: net-snmp-libs = 1:5.5-60.el6 for package: 1:net-snmp-5.5-60.el6.x86_64
--> Processing Dependency: libsensors.so.4()(64bit) for package: 1:net-snmp-5.5-60.el6.x86_64
--> Processing Dependency: libnetsnmptrapd.so.20()(64bit) for package: 1:net-snmp-5.5-60.el6.x86_64
--> Processing Dependency: libnetsnmpmibs.so.20()(64bit) for package: 1:net-snmp-5.5-60.el6.x86_64
--> Processing Dependency: libnetsnmphelpers.so.20()(64bit) for package: 1:net-snmp-5.5-60.el6.x86_64
--> Processing Dependency: libnetsnmpagent.so.20()(64bit) for package: 1:net-snmp-5.5-60.el6.x86_64
--> Processing Dependency: libnetsnmp.so.20()(64bit) for package: 1:net-snmp-5.5-60.el6.x86_64
---> Package net-snmp-utils.x86_64 1:5.5-60.el6 will be installed
--> Running transaction check
---> Package lm_sensors-libs.x86_64 0:3.1.1-17.el6 will be installed
---> Package net-snmp-libs.x86_64 1:5.5-60.el6 will be installed
--> Finished Dependency Resolution

Dependencies Resolved

================================================================================
Package Arch Version Repository Size
================================================================================
Installing:
net-snmp x86_64 1:5.5-60.el6 base 309 k
net-snmp-utils x86_64 1:5.5-60.el6 base 177 k
Installing for dependencies:
lm_sensors-libs x86_64 3.1.1-17.el6 base 38 k
net-snmp-libs x86_64 1:5.5-60.el6 base 1.5 M

Transaction Summary
================================================================================
Install 4 Package(s)

Total download size: 2.1 M
Installed size: 6.7 M
Downloading Packages:
Setting up and reading Presto delta metadata
Processing delta metadata
Package(s) data still to download: 2.1 M
(1/4): lm_sensors-libs-3.1.1-17.el6.x86_64.rpm | 38 kB 00:00
(2/4): net-snmp-5.5-60.el6.x86_64.rpm | 309 kB 00:00
(3/4): net-snmp-libs-5.5-60.el6.x86_64.rpm | 1.5 MB 00:00
(4/4): net-snmp-utils-5.5-60.el6.x86_64.rpm | 177 kB 00:00
-----------------------------------------------------------------------------------------------------------------------------------------
Total 6.9 MB/s | 2.1 MB 00:00
Running rpm_check_debug
Running Transaction Test
Transaction Test Succeeded
Running Transaction
Installing : lm_sensors-libs-3.1.1-17.el6.x86_64 1/4
Installing : 1:net-snmp-libs-5.5-60.el6.x86_64 2/4
Installing : 1:net-snmp-utils-5.5-60.el6.x86_64 3/4
Installing : 1:net-snmp-5.5-60.el6.x86_64 4/4
Verifying : 1:net-snmp-utils-5.5-60.el6.x86_64 1/4
Verifying : lm_sensors-libs-3.1.1-17.el6.x86_64 2/4
Verifying : 1:net-snmp-libs-5.5-60.el6.x86_64 3/4
Verifying : 1:net-snmp-5.5-60.el6.x86_64 4/4

Installed:
net-snmp.x86_64 1:5.5-60.el6 net-snmp-utils.x86_64 1:5.5-60.el6

Dependency Installed:
lm_sensors-libs.x86_64 0:3.1.1-17.el6 net-snmp-libs.x86_64 1:5.5-60.el6

Complete!
[root@linuxnix ~]#
Step 2: Configure snmpd
Add the following lines in the/etc/snmp/snmpd.conf file.
rocommunity public
syslocation "ColekColek"
syscontact xxxxxx@yahoo.com
com2sec public localhost public
group public v1 public
group public v2c public
group public usm public
view all included .1
access public "" any noauth exact all none none
Add the following lines in the /etc/default/snmpd file.
SNMPDRUN=yes
SNMPDOPTS='-Lsd -Lf /dev/null -u snmp -g snmp -I -smux -p /var/run/snmpd.pid -c /etc/snmp/snmpd.conf'
TRAPDRUN=yes
SNMPDCOMPAT=yes
Now restart/start the snmp service.
[root@linuxnix ~]# service snmpd restart
Stopping snmpd: [FAILED]
Starting snmpd: [ OK ]
[root@linuxnix ~]#
Also at this juncture we’ll start the apache web server as well.
[root@linuxnix ~]# service httpd restart
Stopping httpd: [ OK ]
Starting httpd: httpd: Could not reliably determine the server's fully qualified domain name, using 13.229.243.69 for ServerName
[ OK ]
[root@linuxnix ~]#
Step 3: Install MRTG
Now that we have installed the prerequisite packages we’ll proceed to the installation of the MRTG package.
[root@linuxnix ~]# yum install mrtg -y
Loaded plugins: fastestmirror, presto
Setting up Install Process
Loading mirror speeds from cached hostfile
* base: download.nus.edu.sg
* extras: download.nus.edu.sg
* updates: download.nus.edu.sg
Resolving Dependencies
--> Running transaction check
---> Package mrtg.x86_64 0:2.16.2-9.el6 will be installed
-----------------------------------------------------------------------output truncated for brevity

Dependencies Resolved

================================================================================
Package Arch Version Repository Size
================================================================================
Installing:
mrtg x86_64 2.16.2-9.el6 base 694 k
Installing for dependencies:
fontconfig x86_64 2.8.0-5.el6 base 186 k
freetype x86_64 2.3.11-17.el6 base 361 k
gd x86_64 2.0.35-11.el6 base 142 k
libX11 x86_64 1.6.4-3.el6 base 587 k
libX11-common noarch 1.6.4-3.el6 base 171 k
libXau x86_64 1.0.6-4.el6 base 24 k
libXpm x86_64 3.5.10-2.el6 base 51 k
libjpeg-turbo x86_64 1.2.1-3.el6_5 base 174 k
libpng x86_64 2:1.2.49-2.el6_7 base 182 k
libxcb x86_64 1.12-4.el6 base 180 k
mrtg-libs x86_64 2.16.2-9.el6 base 95 k
perl-IO-Socket-INET6 noarch 2.56-4.el6 base 17 k
perl-SNMP_Session noarch 1.12-4.el6 base 67 k
perl-Socket6 x86_64 0.23-4.el6 base 27 k

Transaction Summary
================================================================================
Install 15 Package(s)

Total download size: 2.9 M
Installed size: 9.0 M
Downloading Packages:
Setting up and reading Presto delta metadata
Processing delta metadata
Package(s) data still to download: 2.9 M
(1/15): fontconfig-2.8.0-5.el6.x86_64.rpm | 186 kB 00:00
(2/15): freetype-2.3.11-17.el6.x86_64.rpm | 361 kB 00:00
(3/15): gd-2.0.35-11.el6.x86_64.rpm | 142 kB 00:00
(4/15): libX11-1.6.4-3.el6.x86_64.rpm | 587 kB 00:00
(5/15): libX11-common-1.6.4-3.el6.noarch.rpm | 171 kB 00:00
(6/15): libXau-1.0.6-4.el6.x86_64.rpm | 24 kB 00:00
(7/15): libXpm-3.5.10-2.el6.x86_64.rpm | 51 kB 00:00
(8/15): libjpeg-turbo-1.2.1-3.el6_5.x86_64.rpm | 174 kB 00:00
(9/15): libpng-1.2.49-2.el6_7.x86_64.rpm | 182 kB 00:00
(10/15): libxcb-1.12-4.el6.x86_64.rpm | 180 kB 00:00
(11/15): mrtg-2.16.2-9.el6.x86_64.rpm | 694 kB 00:00
(12/15): mrtg-libs-2.16.2-9.el6.x86_64.rpm | 95 kB 00:00
(13/15): perl-IO-Socket-INET6-2.56-4.el6.noarch.rpm | 17 kB 00:00
(14/15): perl-SNMP_Session-1.12-4.el6.noarch.rpm | 67 kB 00:00
(15/15): perl-Socket6-0.23-4.el6.x86_64.rpm | 27 kB 00:00
-----------------------------------------------------------------------------------------------------------------------------------------
Total 4.7 MB/s | 2.9 MB 00:00
-----------------------------------------------------------------------output truncated for brevity 15/15

Installed:
mrtg.x86_64 0:2.16.2-9.el6

Dependency Installed:
fontconfig.x86_64 0:2.8.0-5.el6 freetype.x86_64 0:2.3.11-17.el6 gd.x86_64 0:2.0.35-11.el6 libX11.x86_64 0:1.6.4-3.el6 libX11-common.noarch 0:1.6.4-3.el6
libXau.x86_64 0:1.0.6-4.el6 libXpm.x86_64 0:3.5.10-2.el6 libjpeg-turbo.x86_64 0:1.2.1-3.el6_5 libpng.x86_64 2:1.2.49-2.el6_7 libxcb.x86_64 0:1.12-4.el6
mrtg-libs.x86_64 0:2.16.2-9.el6 perl-IO-Socket-INET6.noarch 0:2.56-4.el6 perl-SNMP_Session.noarch 0:1.12-4.el6 perl-Socket6.x86_64 0:0.23-4.el6

Complete!
[root@linuxnix ~]#
Step 4: MRTG configuration
1) Create the /var/www/mrtg directory if it does not exist already.
[root@linuxnix ~]# ls -ld /var/www/mrtg
drwxr-xr-x 2 root root 4096 Jul 23 08:10 /var/www/mrtg
[root@linuxnix ~]#
Set ownership of the directory to apache user.
[root@linuxnix ~]# chown -R apache:apache /var/www/mrtg
[root@linuxnix ~]#
Now we will use the cfgmaker tool to create a configuration file for the device we intend to monitor using MRTG.
cfgmaker will automatically detect the interfaces that can be monitored. The syntax for using the cfgmaker command is as follows:
cfgmaker {community}@{ip_address} > /etc/mrtg-{device}.cfg
Given below is a description of the parameters used in the above command.
community – The SNMP community, usually it’s “public” by default.
ip_address – host name or IP address of the device being monitored.
device – Some name describing the device being monitored, ex. firewall, router etc.
cfgmaker --global 'WorkDir:/var/www/mrtg' --ifref=name --ifdesc=eth --global 'Options[_]: bits' --output /etc/mrtg.cfg public@localhost
We’ve set the WorkDir option to ensure that the graph images generated by MRTG are created in the /var/www/mrtg directory. Next we will create an index file showing graphs for all interfaces of the device being monitored using the indexmaker command. The syntax for the command is as follows:
indexmaker /etc/mrtg-{device}.cfg > /var/www/mrtg/index.html
Let’s execute the command now.
[root@linuxnix ~]# indexmaker /etc/mrtg.cfg > /var/www/mrtg/index.html
Now we will run MRTG.
env LANG=C /usr/bin/mrtg /etc/mrtg.cfg
After the completion of the above command we’ll schedule it as a cron job so as to ensure that MRTG continues gathering statistical data at regular intervals and plot graph images from it.
[root@linuxnix conf.d]# crontab -l
*/5 * * * * env LANG=C /usr/bin/mrtg /etc/mrtg.cfg
[root@linuxnix conf.d]#
In order to view the graphical images generated by MRTG, it creates a virtual hosts file named mrtg.conf in the /etc/httpd/conf.d directory. Let’s review this file.
[root@linuxnix conf.d]# pwd
/etc/httpd/conf.d
[root@linuxnix conf.d]# cat mrtg.conf
#
# This configuration file maps the mrtg output (generated daily)
# into the URL space. By default these results are only accessible
# from the local host.
#
Alias /mrtg /var/www/mrtg

<Location /mrtg>
Order deny,allow
Allow from all
# Allow from .example.com
</Location>
[root@linuxnix conf.d]#
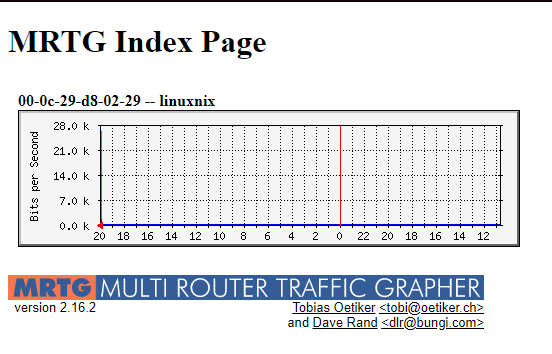
This completes the basic configuration of MRTG on our system. We can now view graphs generated by MRTG by opening the URL http://<ip address>/mrtg. Given below is the image displayed when I opened the URL for my system.
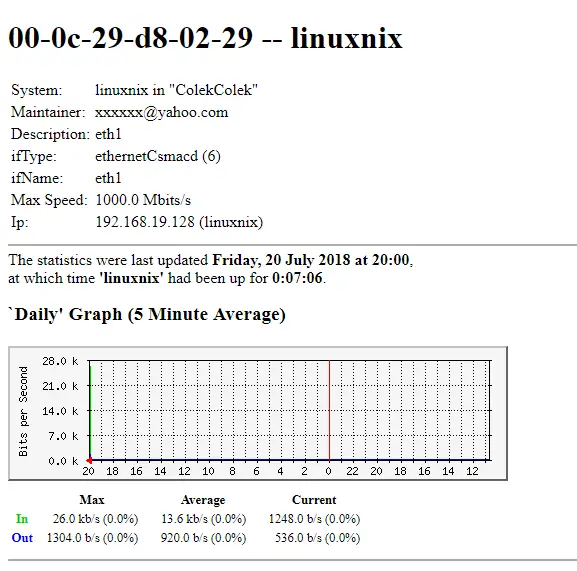
The hexadecimal string of numbers being displayed in the image is the MAC address of the interface for which network traffic statistics are being captured. If we click on the image more detailed information and graphs are displayed. Given below is a screenshot from the detailed data displayed after I clicked on the image.
Conclusion
In this article we demonstrated the installation and setup of MRTG tool for analyzing network traffic. We hope that you found the article useful and we look forward to your suggestions and feedback
Sahil Suri
Latest posts by Sahil Suri (see all)
- Google Cloud basics: Activate Cloud Shell - May 19, 2021
- Create persistent swap partition on Azure Linux VM - May 18, 2021
- DNF, YUM and RPM package manager comparison - May 17, 2021
- Introduction to the aptitude package manager for Ubuntu - March 26, 2021
- zypper package management tool examples for managing packages on SUSE Linux - March 26, 2021


