Introduction
In our ongoing series of articles covering various software management tools, we have already covered, dpkg,apt-get and apt. In this article, we’ll cover the aptitude tool for package management on our Ubuntu 16.04 system. The aptitude command is a very useful, text-based utility for managing packages on your server. Some administrators use it as an alternative to apt. The aptitude package management software provides a command line utility named aptitude but a powerful text user interface as well. The TUI displays a list of software packages and allows the user to interactively pick packages to install or remove. The aptitude text user interface is based on the curses computer terminal library, with which it provides an interface that incorporates some elements commonly seen in graphical user interfaces (GUIs).
Given below are some of the useful features of aptitude:
- a mutt-like syntax for matching packages in a flexible manner
- mark packages as “automatically installed” or “manually installed” so that packages can be auto-removed when no longer required
- colorful preview of actions about to be taken
- dselect-like persistence of user actions
- the ability to retrieve and display the Debian changelog of most packages
- AptCLI-like (= apt-get + apt-cache) command line mode
- Score-based and (usually) smarter dependency resolver than apt-get
Installing aptitude:
The aptitude software is not installed on the system by default.
We can install it by using the following command:
root@linuxnix:~# apt install aptitude
Reading package lists... Done
Building dependency tree
Reading state information... Done
The following packages were automatically installed and are no longer required:
libblas-common libblas3 liblinear3 liblua5.2-0 libxslt1.1 linux-aws-headers-4.4.0-1032 linux-headers-4.4.0-1032-aws
linux-image-4.4.0-1032-aws lua-lpeg ndiff python-bs4 python-chardet python-html5lib python-lxml python-pkg-resources python-six
zsh-common
Use 'apt autoremove' to remove them.
The following additional packages will be installed:
aptitude-common libboost-iostreams1.58.0 libcgi-fast-perl libcgi-pm-perl libclass-accessor-perl libcwidget3v5
libencode-locale-perl libfcgi-perl libhtml-parser-perl libhtml-tagset-perl libhttp-date-perl libhttp-message-perl
libio-html-perl libio-string-perl liblwp-mediatypes-perl libparse-debianchangelog-perl libsigc++-2.0-0v5 libsub-name-perl
libtimedate-perl liburi-perl libxapian22v5
Suggested packages:
apt-xapian-index aptitude-doc-en | aptitude-doc debtags tasksel libcwidget-dev libdata-dump-perl libhtml-template-perl
libxml-simple-perl libwww-perl xapian-tools
The following NEW packages will be installed:
aptitude aptitude-common libboost-iostreams1.58.0 libcgi-fast-perl libcgi-pm-perl libclass-accessor-perl libcwidget3v5
libencode-locale-perl libfcgi-perl libhtml-parser-perl libhtml-tagset-perl libhttp-date-perl libhttp-message-perl
libio-html-perl libio-string-perl liblwp-mediatypes-perl libparse-debianchangelog-perl libsigc++-2.0-0v5 libsub-name-perl
libtimedate-perl liburi-perl libxapian22v5
0 upgraded, 22 newly installed, 0 to remove and 0 not upgraded.
Need to get 3,647 kB of archives.
After this operation, 14.7 MB of additional disk space will be used.
Do you want to continue? [Y/n] Y
--------------------------------------------------------------output truncated for brevity
Aptitude command line interface examples
The aptitude command line interface provides most of the features as that of the apt package manager.
Example 1: Search for a package
To search for a package we use the aptitude search command followed by the package name.
Let’s search for the byobu package.
root@linuxnix:~# aptitude search byobu
i byobu - text window manager, shell multiplexer, integrated DevOps environmen
v byobu-extras -
root@linuxnix:~#
The i on the leftmost corner of the output indicates an installed package and the v indicates a virtual package.
We will explain the other possible alternatives that could exist aside from i and v when we explain the aptitude text user interface.
Example 2: Retrieve information about a package
To query information about a package use the aptitude show command followed by the package name.
root@linuxnix:~# aptitude show byobu
Package: byobu
State: installed
Automatically installed: no
Version: 5.106-0ubuntu1
Priority: optional
Section: misc
Maintainer: Dustin Kirkland <kirkland@ubuntu.com>
Architecture: all
Uncompressed Size: 654 k
Depends: debconf (>= 0.5) | debconf-2.0, gettext-base, python3 | python, python3-newt | python-newt, tmux (>= 1.5) | screen, gawk
Recommends: pastebinit, screen, tmux (>= 1.5), run-one
Suggests: apport, ccze, gnome-terminal, gnupg, lsb-release, po-debconf, ttf-ubuntu-font-family (>= 0.80-0ubuntu1~medium),
update-notifier-common, vim, wireless-tools
Breaks: bikeshed (< 1.64), byobu-extras (< 2.17), screen-profiles (< 2.0), screen-profiles-extras (< 2.0)
Replaces: bikeshed (< 1.64), byobu-extras (< 2.17), screen-profiles (< 2.0), screen-profiles-extras (< 2.0)
Enhances: screen
Provides: byobu-extras, screen-profiles, screen-profiles-extras
Description: text window manager, shell multiplexer, integrated DevOps environment
Byobu is Ubuntu's powerful text-based window manager, shell multiplexer, and integrated DevOps environment.
Using Byobu, you can quickly create and move between different windows over a single SSH connection or TTY terminal, split each of
those windows into multiple panes, monitor dozens of important statistics about your system, detach and reattach to sessions later
while your programs continue to run in the background.
Homepage: http://byobu.org
Example 3: Install a package
We use the aptitude install command followed by the package name to install a new package using aptitude.
Let’s install the nmap package.
root@linuxnix:~# aptitude install nmap
The following NEW packages will be installed:
nmap
0 packages upgraded, 1 newly installed, 0 to remove and 0 not upgraded.
Need to get 0 B/4,638 kB of archives. After unpacking 21.3 MB will be used.
Selecting previously unselected package nmap.
(Reading database ... 109863 files and directories currently installed.)
Preparing to unpack .../nmap_7.01-2ubuntu2_amd64.deb ...
Unpacking nmap (7.01-2ubuntu2) ...
Processing triggers for man-db (2.7.5-1) ...
Setting up nmap (7.01-2ubuntu2) ...
Example 4: Remove a package
We use the aptitude remove command followed by the package name to install a new package using aptitude.
Let’s remove the nmap package that we installed in the previous example.
root@linuxnix:~# aptitude remove nmap
The following packages will be REMOVED:
nmap
0 packages upgraded, 0 newly installed, 1 to remove and 0 not upgraded.
Need to get 0 B of archives. After unpacking 21.3 MB will be freed.
(Reading database ... 110643 files and directories currently installed.)
Removing nmap (7.01-2ubuntu2) ...
Processing triggers for man-db (2.7.5-1) ...
Example 5: Update the system
The safest way to upgrade is to use the action “safe-upgrade”.
The new action will upgrade a package only if it does not impact other packages.
If it is necessary to add or remove a dependency package during the upgrade, safe-upgrade won’t upgrade.
root@linuxnix:~# aptitude safe-upgrade
No packages will be installed, upgraded, or removed.
0 packages upgraded, 0 newly installed, 0 to remove and 0 not upgraded.
Need to get 0 B of archives. After unpacking 0 B will be used.
Since the system I’m working on is a newly built EC2 instance, the safe-upgrade command returned without installing or updating any packages.
Example 6: Full system upgrade
If you want to force the upgrade anyway, the action “full-upgrade” can be used.
With this command, aptitude will upgrade to the latest version of a package even if it is necessary to add or remove dependencies.
root@linuxnix:~# aptitude full-upgrade
No packages will be installed, upgraded, or removed.
0 packages upgraded, 0 newly installed, 0 to remove and 0 not upgraded.
Need to get 0 B of archives. After unpacking 0 B will be used.
Aptitude text user interface examples
To launch the aptitude text user interface, type aptitude on the command line and press enter.
The below window-based menu should appear on the screen.
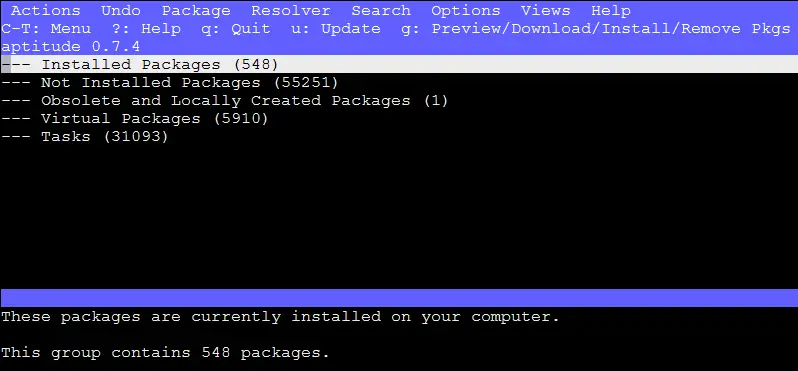
To have access to the various menu options, you will have to press Ctrl+T and use the use arrow keys to navigate through the menu.
Installing packages
From the aptitude home screen, bring the cursor on the “Not installed packages” line and press enter.
This will now expand out to the categories of packages available to be installed.
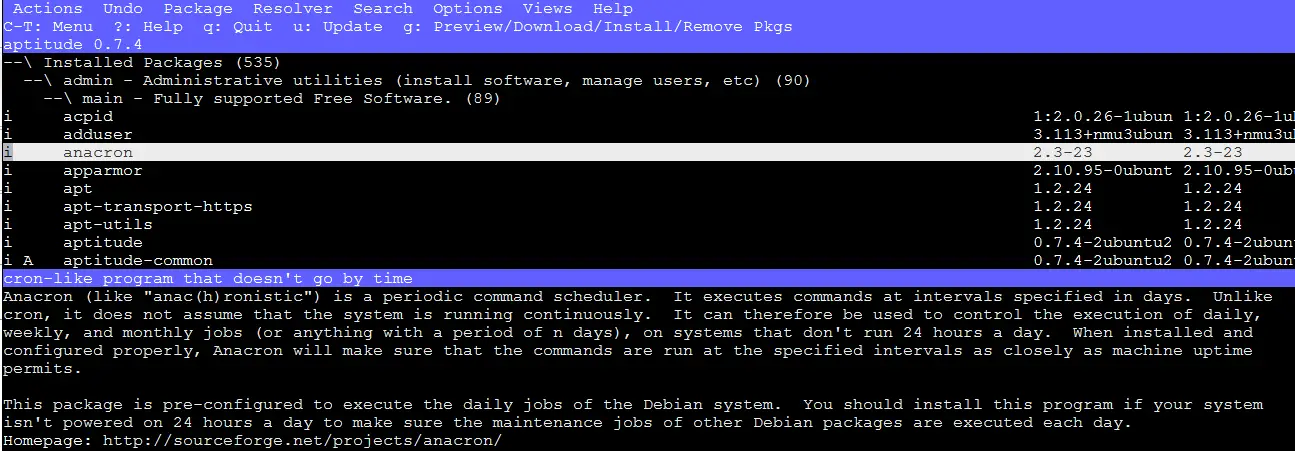
For the purpose of this demonstration, I’d like to install the anacron utility.
So I bring my cursor to the admin package group and then press enter to expand it.
From there I expand the main category of packages and bring the cursor to the anacron package.

Once I have my cursor on this package name, I’d need to press the + keyboard key to select it for installation.
Press the g key twice to install the package.
Removing packages
From the aptitude home screen, bring the cursor on the “Installed packages” line and press enter.
This will now expand out to the categories of packages installed on the system
We’ll remove the anacron package that we installed in the previous example.
Once I’ve selected the package that I need to remove, press the – keyboard key.
This marks the package to be removed.

Now, press the g keyboard key twice to remove the package.
At that prompt, pressing the enter key again will take you back to the aptitude main menu.
Press q to quit and exit from the aptitude menu. You will be prompted if you really wish to quit. Select yes here to come out of the menu.
Conclusion
This was the final article in our exploration of package managers for Debian based operating systems.
We hope you’ve found this article and the rest of the articles in the series helpful and we look forward towards your feedback.
Sahil Suri
Latest posts by Sahil Suri (see all)
- Google Cloud basics: Activate Cloud Shell - May 19, 2021
- Create persistent swap partition on Azure Linux VM - May 18, 2021
- DNF, YUM and RPM package manager comparison - May 17, 2021
- Introduction to the aptitude package manager for Ubuntu - March 26, 2021
- zypper package management tool examples for managing packages on SUSE Linux - March 26, 2021