
Introduction
Oracle VM Virtualbox popularly referred to as Virtualbox is a is a powerful x86 and AMD64/Intel64 virtualization product for enterprise as well as home use. Not only is VirtualBox an extremely feature rich, high performance product for enterprise customers, it is also the only professional solution that is freely available as Open Source Software under the terms of the GNU General Public License (GPL) version 2. When we describe VirtualBox as a “virtualization” product, we refer to “full virtualization”, that is, the particular kind of virtualization that allows an unmodified operating system with all of its installed software to run in a special environment, on top of your existing operating system. This environment, called a “virtual machine”, is created by the virtualization software by intercepting access to certain hardware components and certain features. The physical computer is then usually called the “host”, while the virtual machine is often called a “guest”. Most of the guest code runs unmodified, directly on the host computer, and the guest operating system “thinks” it’s running on real machine.
VirtualBox can be installed on host operating systems, including Linux, Windows, Solaris, OS X, and OpenSolaris. From version 2.0 VirtualBox supports 32 and 64bit host and guest operating systems. If you want to install 64bit guests then your processor must support hardware virtualization and the host operating system must be 64bit as well. Hardware virtualization on an Intel processor based system is enabled by turning on VT-x in the system BIOS. In this article we will install VirtualBox version 5.2 on a Centos 7 system.
Step 1: Install dependencies
Before we can install VirtualBox we need to install some dependencies in the form of development tools for Linux.
[root@linuxnix ~]# yum install -y kernel-devel kernel-headers gcc make perl
Loaded plugins: fastestmirror, langpacks
Loading mirror speeds from cached hostfile
* base: mirror.nbrc.ac.in
* extras: mirrors.nhanhoa.com
* updates: mirrors.viethosting.com
Resolving Dependencies
--> Running transaction check
----------------------------------------------output truncated for brevity
Dependencies Resolved

================================================================================
Package Arch Version Repository Size
================================================================================
Installing:
gcc x86_64 4.8.5-28.el7_5.1 updates 16 M
kernel-devel x86_64 3.10.0-862.11.6.el7 updates 16 M
kernel-headers x86_64 3.10.0-862.11.6.el7 updates 7.1 M
Updating:
make x86_64 1:3.82-23.el7 base 420 k
perl x86_64 4:5.16.3-292.el7 base 8.0 M
Installing for dependencies:
cpp x86_64 4.8.5-28.el7_5.1 updates 5.9 M
glibc-devel x86_64 2.17-222.el7 base 1.1 M
glibc-headers x86_64 2.17-222.el7 base 678 k
libmpc x86_64 1.0.1-3.el7 base 51 k
perl-Time-HiRes x86_64 4:1.9725-3.el7 base 45 k
Updating for dependencies:
glibc x86_64 2.17-222.el7 base 3.6 M
glibc-common x86_64 2.17-222.el7 base 11 M
libgcc x86_64 4.8.5-28.el7_5.1 updates 101 k
libgomp x86_64 4.8.5-28.el7_5.1 updates 156 k
perl-libs x86_64 4:5.16.3-292.el7 base 688 k

Transaction Summary
================================================================================
Install 3 Packages (+5 Dependent packages)
Upgrade 2 Packages (+5 Dependent packages)

Total size: 71 M
Total download size: 71 M
Downloading packages:
------------------------------------------output truncated for brevity

Installed:
gcc.x86_64 0:4.8.5-28.el7_5.1 kernel-devel.x86_64 0:3.10.0-862.11.6.el7 kernel-headers.x86_64 0:3.10.0-862.11.6.el7

Dependency Installed:
cpp.x86_64 0:4.8.5-28.el7_5.1 glibc-devel.x86_64 0:2.17-222.el7 glibc-headers.x86_64 0:2.17-222.el7 libmpc.x86_64 0:1.0.1-3.el7 perl-Time-HiRes.x86_64 4:1.9725-3.el7

Updated:
make.x86_64 1:3.82-23.el7 perl.x86_64 4:5.16.3-292.el7

Dependency Updated:
glibc.x86_64 0:2.17-222.el7 glibc-common.x86_64 0:2.17-222.el7 libgcc.x86_64 0:4.8.5-28.el7_5.1 libgomp.x86_64 0:4.8.5-28.el7_5.1 perl-libs.x86_64 4:5.16.3-292.el7

Complete!
[root@linuxnix ~]#
Step 2: Download and import the Oracle public key
We will now download and import the public key for the Oracle repository which we will use to install Oracle VirtualBox.
[root@linuxnix ~]# wget https://www.virtualbox.org/download/oracle_vbox.asc
--2018-09-19 11:10:12-- https://www.virtualbox.org/download/oracle_vbox.asc
Resolving www.virtualbox.org (www.virtualbox.org)... 137.254.60.32
Connecting to www.virtualbox.org (www.virtualbox.org)|137.254.60.32|:443... connected.
HTTP request sent, awaiting response... 200 OK
Length: 1734 (1.7K) [text/plain]
Saving to: ‘oracle_vbox.asc’

100%[==============================================================================================================================================================>] 1,734 5.41KB/s in 0.3s

2018-09-19 11:10:14 (5.41 KB/s) - ‘oracle_vbox.asc’ saved [1734/1734]

[root@linuxnix ~]# rpm --import oracle_vbox.asc

Step 3: Download the VirtualBox repository file for CentOS 7 and save it under into /etc/yum.repos.d/virtualbox.repo

[root@linuxnix ~]# wget http://download.virtualbox.org/virtualbox/rpm/el/virtualbox.repo -O /etc/yum.repos.d/virtualbox.repo
--2018-09-19 11:10:37-- http://download.virtualbox.org/virtualbox/rpm/el/virtualbox.repo
Resolving download.virtualbox.org (download.virtualbox.org)... 184.27.50.48
Connecting to download.virtualbox.org (download.virtualbox.org)|184.27.50.48|:80... connected.
HTTP request sent, awaiting response... 200 OK
Length: 259 [text/plain]
Saving to: ‘/etc/yum.repos.d/virtualbox.repo’

100%[==============================================================================================================================================================>] 259 --.-K/s in 0s

2018-09-19 11:10:41 (10.4 MB/s) - ‘/etc/yum.repos.d/virtualbox.repo’ saved [259/259]
The virtualbox.repo file has the following content
[root@linuxnix ~]# cat /etc/yum.repos.d/virtualbox.repo
[virtualbox]
name=Oracle Linux / RHEL / CentOS-$releasever / $basearch - VirtualBox
baseurl=http://download.virtualbox.org/virtualbox/rpm/el/$releasever/$basearch
enabled=1
gpgcheck=1
repo_gpgcheck=1
gpgkey=https://www.virtualbox.org/download/oracle_vbox.asc
[root@linuxnix ~]#
Step 4: Install VirtualBox
Now that we have the GPG key and the required yum repository setup we just need to run the yum install command to install the package.
[root@linuxnix ~]# yum install -y VirtualBox-5.2
Loaded plugins: fastestmirror, langpacks
virtualbox/7/x86_64/signature | 181 B 00:00:00
Retrieving key from https://www.virtualbox.org/download/oracle_vbox.asc
Importing GPG key 0x98AB5139:
Userid : "Oracle Corporation (VirtualBox archive signing key) <info@virtualbox.org>"
Fingerprint: 7b0f ab3a 13b9 0743 5925 d9c9 5442 2a4b 98ab 5139
From : https://www.virtualbox.org/download/oracle_vbox.asc
virtualbox/7/x86_64/signature | 2.9 kB 00:00:05 !!!
virtualbox/7/x86_64/primary_db | 107 kB 00:00:01
Loading mirror speeds from cached hostfile
* base: mirror.nbrc.ac.in
* extras: mirrors.nhanhoa.com
* updates: mirrors.viethosting.com
Resolving Dependencies
--> Running transaction check
---> Package VirtualBox-5.2.x86_64 0:5.2.18_124319_el7-1 will be installed
--> Finished Dependency Resolution

Dependencies Resolved

================================================================================
Package Arch Version Repository Size
================================================================================
Installing:
VirtualBox-5.2 x86_64 5.2.18_124319_el7-1 virtualbox 76 M

Transaction Summary
================================================================================
Install 1 Package

Total download size: 76 M
Installed size: 173 M
Downloading packages:
VirtualBox-5.2-5.2.18_124319_el7-1.x86_64.rpm | 76 MB 00:03:24
Running transaction check
Running transaction test
Transaction test succeeded
Running transaction
Installing : VirtualBox-5.2-5.2.18_124319_el7-1.x86_64 1/1

Creating group 'vboxusers'. VM users must be member of that group!

This system is currently not set up to build kernel modules.
Please install the Linux kernel "header" files matching the current kernel
for adding new hardware support to the system.
The distribution packages containing the headers are probably:
kernel-devel kernel-devel-3.10.0-123.el7.x86_64
This system is currently not set up to build kernel modules.
Please install the Linux kernel "header" files matching the current kernel
for adding new hardware support to the system.
The distribution packages containing the headers are probably:
kernel-devel kernel-devel-3.10.0-123.el7.x86_64

There were problems setting up VirtualBox. To re-start the set-up process, run
/sbin/vboxconfig
as root.
Verifying : VirtualBox-5.2-5.2.18_124319_el7-1.x86_64 1/1

Installed:
VirtualBox-5.2.x86_64 0:5.2.18_124319_el7-1

Complete!
[root@linuxnix ~]#
We have explained the troubleshooting steps for this error in a separate article.
Step 5: Start and enable the VirtualBox service
Now that we have installed VirtualBox successfully on our system we need to start and enable the corresponding service named vboxdrv.
[root@linuxnix ~]# systemctl start vboxdrv.service
[root@linuxnix ~]#
[root@linuxnix ~]# systemctl status vboxdrv.service
● vboxdrv.service - VirtualBox Linux kernel module
Loaded: loaded (/usr/lib/virtualbox/vboxdrv.sh; enabled; vendor preset: disabled)
Active: active (exited) since Wed 2018-09-19 12:48:26 EDT; 14min ago
Process: 727 ExecStart=/usr/lib/virtualbox/vboxdrv.sh start (code=exited, status=0/SUCCESS)

Sep 19 12:46:52 alive systemd[1]: Starting VirtualBox Linux kernel module...
Sep 19 12:46:55 alive vboxdrv.sh[727]: vboxdrv.sh: Starting VirtualBox services.
Sep 19 12:46:55 alive vboxdrv.sh[763]: Starting VirtualBox services.
Sep 19 12:46:55 alive vboxdrv.sh[727]: vboxdrv.sh: Building VirtualBox kernel modules.
Sep 19 12:46:55 alive vboxdrv.sh[768]: Building VirtualBox kernel modules.
Sep 19 12:48:26 alive systemd[1]: Started VirtualBox Linux kernel module.
[root@linuxnix ~]#
[root@linuxnix ~]# systemctl enable vboxdrv.service
[root@linuxnix ~]#
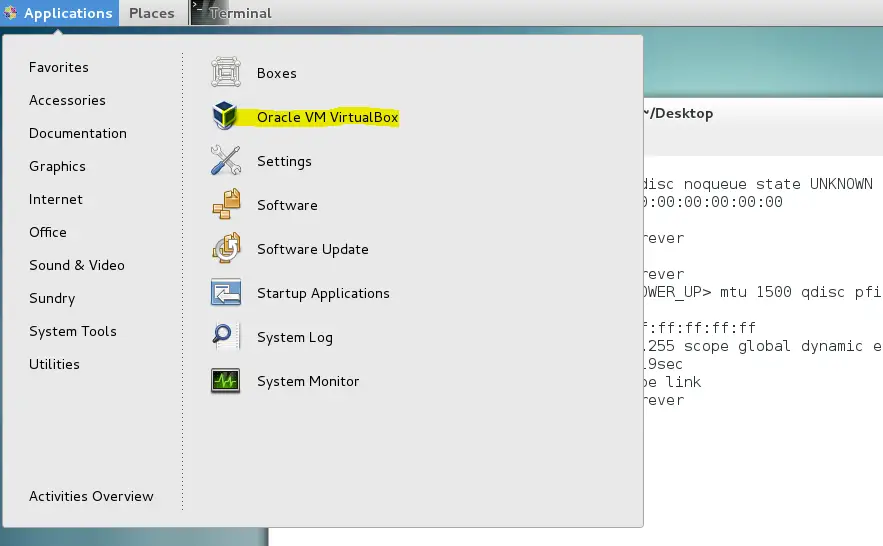
I had installed CentOS 7 with the gnome GUI interface so on my system I could navigate to applications->System tools-> Oracle VM VirtualBox to access VirtualBox.
You can access the VirtualBox command line interface using the virtualbox command which launch the application.
[root@linuxnix ~]# virtualbox
Conclusion
With this our installation of VirtualBox software on CentOS 7 is complete.
Sahil Suri
Latest posts by Sahil Suri (see all)
- Google Cloud basics: Activate Cloud Shell - May 19, 2021
- Create persistent swap partition on Azure Linux VM - May 18, 2021
- DNF, YUM and RPM package manager comparison - May 17, 2021
- Introduction to the aptitude package manager for Ubuntu - March 26, 2021
- zypper package management tool examples for managing packages on SUSE Linux - March 26, 2021