

Introduction
Thus far we’ve explored different features of the GIT version control system like viewing a log of the git commit history, viewing differences between staged and committed versions of files. We also explained the concept of HEAD and explored how we could use the git checkout command to revert to previous versions of files and most recently we demonstrated how we could integrate and store our local repositories remotely on GitHub, a service for storing all the git related data on our local systems. In this article, we will be explaining one of the most important features of the git version control system i.e. branching.
What are branches?
Thus far we’ve been making all our commits on the master branch. In this article we will demonstrate how we can create more branches. When we start working with more complicated workflows we need to be ensure that we have a stable state of our data to return to. Therefore, while using git we take care that the master branch always contains code that can execute without failure. But we still want to make commits while we are testing our code. In this scenario we use branches.
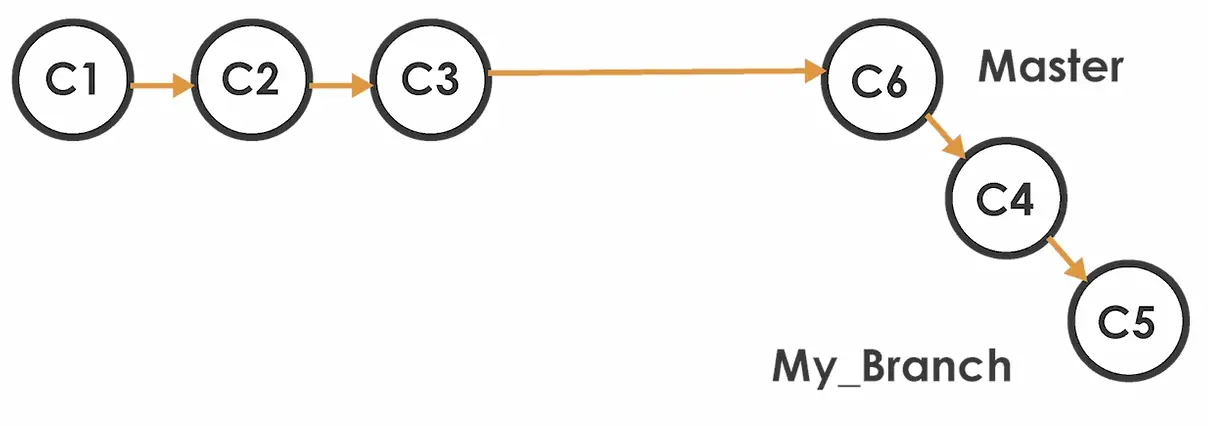
In the above image we have a master branch and we have a branch named my_branch which also contains some commits. The branch my_branch would comprise of commits we made while we were prototyping and testing our code and we always have the master branch to fall back to.
How to create a branch?
Creating a branch in git is simple. We simply need to type git with the branch sub command followed by the branch name. Master is the default name given to the first branch that was created when we initialized our repository with the ‘git init’ command. Now within our git repository /home/sahil/perl_scripts_for_training let’s create a branch named my_branch.
[sahil@linuxnix perl_scripts_for_training]$ pwd
/home/sahil/perl_scripts_for_training
[sahil@linuxnix perl_scripts_for_training]$
[sahil@linuxnix perl_scripts_for_training]$ git branch my_branch
[sahil@linuxnix perl_scripts_for_training]$
How to view available branches?
So now that we have created a branch named my_branch how do we verify its existence? We can check the available branches in our git repository by using the git branch command with the -a option as shown below.
[sahil@linuxnix perl_scripts_for_training]$ git branch -a
* master
my_branch
remotes/origin/master
[sahil@linuxnix perl_scripts_for_training]$
The * symbol to the left of the master branch indicates that we are currently on the master branch. Since we’ve been working with GitHub as our remote for this repository, the remote branch is also mentioned.
Changing branches
In one of our earlier articles on the git version control system, we explained how we could use the git checkout command to move the HEAD to a previous state in our git commit history. The same git checkout is used to move between branches. To move to our newly created branch named my_branch we simply need to type git checkout my_branch as shown below.
[sahil@linuxnix perl_scripts_for_training]$ git checkout my_branch
Switched to branch 'my_branch'
Now when we run the git status command, the output of the command will show that we are on branch my_branch and not on the master branch.
[sahil@linuxnix perl_scripts_for_training]$ git status
# On branch my_branch
nothing to commit, working directory clean
[sahil@linuxnix perl_scripts_for_training]$
The output of the ‘git branch -a’ command will also show that we are on the branch my_branch as the * symbol will be next to that branch name.
[sahil@linuxnix perl_scripts_for_training]$ git branch -a
master
* my_branch
remotes/origin/master
[sahil@linuxnix perl_scripts_for_training]$
We can also use the git checkout command to create a branch. To accomplish this we use the git checkout command with the -b option followed by the branch name. Let’s now create a branch using the git checkout command.
[sahil@linuxnix perl_scripts_for_training]$ git checkout -b my_branch_checkout
Switched to a new branch 'my_branch_checkout'
[sahil@linuxnix perl_scripts_for_training]$
In contrast to only creating a branch with the git branch command, when we use the git checkout command to create a branch it creates the branch and moves to that branch as well. Let’s run the git branch -a command to verify that we are now on te branch that we just created.
[sahil@linuxnix perl_scripts_for_training]$ git branch -a
master
my_branch
* my_branch_checkout
remotes/origin/master
[sahil@linuxnix perl_scripts_for_training]$
How to delete a branch?
To delete a branch we use the git branch command with the -d option followed by the name of the branch we would like to delete. Let’s demonstrate this by deleting the branch my_branch.
[sahil@linuxnix perl_scripts_for_training]$ git branch -d my_branch
Deleted branch my_branch (was e9bcebe).
[sahil@linuxnix perl_scripts_for_training]$ git branch -a
master
* my_branch_checkout
remotes/origin/master
[sahil@linuxnix perl_scripts_for_training]$
Note that if you try to delete the branch that you are currently on then git will not allow you to do so. For example, if we attempt to delete the branch my_branch_checkout we will receive an error.
[sahil@linuxnix perl_scripts_for_training]$ git branch -d my_branch_checkout
error: Cannot delete the branch 'my_branch_checkout' which you are currently on.
[sahil@linuxnix perl_scripts_for_training]$
We need to move to a different branch to be able to delete this branch. Since we now only have the master branch to move to we’ll switch to it using the git checkout command and then delete the my_branch_checkout branch.
[sahil@linuxnix perl_scripts_for_training]$ git checkout master
Switched to branch 'master'
[sahil@linuxnix perl_scripts_for_training]$ git branch -d my_branch_checkout
Deleted branch my_branch_checkout (was e9bcebe).
[sahil@linuxnix perl_scripts_for_training]$
[sahil@linuxnix perl_scripts_for_training]$ git branch -a
* master
remotes/origin/master
[sahil@linuxnix perl_scripts_for_training]$
Conclusion
This concludes our introduction to git branches where in we demonstrated how to create branches, move between branches and how to delete branches. In our future articles, we will explain how to merge code from a given branch into the master branch.
Sahil Suri
Latest posts by Sahil Suri (see all)
- Google Cloud basics: Activate Cloud Shell - May 19, 2021
- Create persistent swap partition on Azure Linux VM - May 18, 2021
- DNF, YUM and RPM package manager comparison - May 17, 2021
- Introduction to the aptitude package manager for Ubuntu - March 26, 2021
- zypper package management tool examples for managing packages on SUSE Linux - March 26, 2021

