
![]()
Docker is an open platform for developers and sysadmins to build, ship, and run distributed applications, whether on laptops, data center VMs, or the cloud. To know about Docker in details, click here. The installation and configuration process is described in our different blog. Click here to access that.
Here at linuxnix.com, we have a list of activities to be performed in this Docker series. With these tasks, we will be getting a clear picture on day-to-day docker use and the real-time scenarios we face where we need Docker the most. The lists of the activities are mentioned below:
- Dockerize a 2-Tier Java application by creating a Docker Image.
- Push the same Docker Image to Docker Hub.
- Run a container based version of the Application Database using the Docker-Compose file.
- Ensure data persistence by mounting the data outside of the containers.
In this section, we are going to start the third task. To go through the second task, click here.
Running an Application with Database via Docker-Compose
In the previous blogs, we took a Java project, created a Dockerfile. Built the image using the Dockerfile, created the container, ran it and verified the running application on the port specified. We took the same image and pushed it to the Docker Hub. In this section, we are going to run a database version of this application and run both the container simultaneously via docker-compose.
Docker-Compose File
Docker Compose is a tool for defining and running multi-container Docker containers. Compose uses YAML file to configure the application services. Using compose is just a 3-step process.
- Define a Dockerfile for your application environment.
- Define the services that make your application in docker-compose.yml.
- Run docker-compose up and Compose starts your entire application.
Creating a Database Query
In the application we currently have, we used MySQL for the database. We will go with the same 3-step process. We will create a SQL query for the application database and save it in DB_Scripts.sql. The content of this file can be found in the project repository.
touch DB_Scripts.sqlvi DB_Scripts.sql-- MySQL dump 10.13 Distrib 5.7.15, for Win64 (x86_64)
-- Host: localhost Database: task_management
-- ------------------------------------------------------
-- Server version 5.1.59-community
/*!40101 SET @OLD_CHARACTER_SET_CLIENT=@@CHARACTER_SET_CLIENT */;
/*!40101 SET @OLD_CHARACTER_SET_RESULTS=@@CHARACTER_SET_RESULTS */;
/*!40101 SET @OLD_COLLATION_CONNECTION=@@COLLATION_CONNECTION */;
/*!40101 SET NAMES utf8 */;
/*!40103 SET @OLD_TIME_ZONE=@@TIME_ZONE */;
/*!40103 SET TIME_ZONE='+00:00' */;
/*!40014 SET @OLD_UNIQUE_CHECKS=@@UNIQUE_CHECKS, UNIQUE_CHECKS=0 */;
/*!40014 SET @OLD_FOREIGN_KEY_CHECKS=@@FOREIGN_KEY_CHECKS, FOREIGN_KEY_CHECKS=0 */;
/*!40101 SET @OLD_SQL_MODE=@@SQL_MODE, SQL_MODE='NO_AUTO_VALUE_ON_ZERO' */;
/*!40111 SET @OLD_SQL_NOTES=@@SQL_NOTES, SQL_NOTES=0 */;
-- Table structure for table `employee`
CREATE DATABASE task_management;
USE task_management;
DROP TABLE IF EXISTS `employee`;
/*!40101 SET @saved_cs_client = @@character_set_client */;
/*!40101 SET character_set_client = utf8 */;
CREATE TABLE `employee` (
`employeeId` int(11) NOT NULL AUTO_INCREMENT,
`endTask` date DEFAULT NULL,
`employeeName` varchar(255) DEFAULT NULL,
`startTask` date DEFAULT NULL,
`taskDescription` varchar(255) DEFAULT NULL,
`project_Id` int(11) NOT NULL,
PRIMARY KEY (`employeeId`),
KEY `FK3b0hd6hfo2wn44g5dhcnxlw66` (`project_Id`),
CONSTRAINT `FK3b0hd6hfo2wn44g5dhcnxlw66` FOREIGN KEY (`project_Id`) REFERENCES `project` (`projectId`)
) ENGINE=InnoDB AUTO_INCREMENT=22 DEFAULT CHARSET=latin1;
/*!40101 SET character_set_client = @saved_cs_client */;
-- Dumping data for table `employee`
LOCK TABLES `employee` WRITE;
/*!40000 ALTER TABLE `employee` DISABLE KEYS */;
INSERT INTO `employee` VALUES (7,'2017-04-30','Joey','2017-04-01','UI',1),(8,'2017-04-30','Ross','2017-04-01','Backend',1),(9,'2017-04-28','Monica','2017-04-02','Backend',1),(10,'2017-04-30','Chandler','2017-04-01','Data analysis',3),(11,'2017-04-18','Rachel','2017-04-11','Sales',3),(12,NULL,'Phoebe',NULL,NULL,5),(13,NULL,'Mike',NULL,NULL,5),(14,NULL,'Sawyer',NULL,NULL,4);
/*!40000 ALTER TABLE `employee` ENABLE KEYS */;
UNLOCK TABLES;
-- Table structure for table `project`
DROP TABLE IF EXISTS `project`;
/*!40101 SET @saved_cs_client = @@character_set_client */;
/*!40101 SET character_set_client = utf8 */;
CREATE TABLE `project` (
`projectId` int(11) NOT NULL AUTO_INCREMENT,
`projectName` varchar(255) NOT NULL,
PRIMARY KEY (`projectId`),
UNIQUE KEY `UK_t386d5j9yt8d3js6n14iocnlw` (`projectName`)
) ENGINE=InnoDB AUTO_INCREMENT=6 DEFAULT CHARSET=latin1;
/*!40101 SET character_set_client = @saved_cs_client */;
-- Dumping data for table `project`
LOCK TABLES `project` WRITE;
/*!40000 ALTER TABLE `project` DISABLE KEYS */;
INSERT INTO `project` VALUES (5,'Marriott'),(4,'SWA'),(1,'IGG'),(3,'ADIDAS');
/*!40000 ALTER TABLE `project` ENABLE KEYS */;
UNLOCK TABLES;
/*!40103 SET TIME_ZONE=@OLD_TIME_ZONE */;
/*!40101 SET SQL_MODE=@OLD_SQL_MODE */;
/*!40014 SET FOREIGN_KEY_CHECKS=@OLD_FOREIGN_KEY_CHECKS */;
/*!40014 SET UNIQUE_CHECKS=@OLD_UNIQUE_CHECKS */;
/*!40101 SET CHARACTER_SET_CLIENT=@OLD_CHARACTER_SET_CLIENT */;
/*!40101 SET CHARACTER_SET_RESULTS=@OLD_CHARACTER_SET_RESULTS */;
/*!40101 SET COLLATION_CONNECTION=@OLD_COLLATION_CONNECTION */;
/*!40111 SET SQL_NOTES=@OLD_SQL_NOTES */;
-- Dump completed on 2018-09-08 15:39:33
How to use docker-compose.yml
To spin both containers at a time, the docker-compose file can be used. We have to start writing the file keeping the dependency in mind. So here in our project, we have database attached to it since it a 2-tier application.
So the application is dependent on the database. While writing the configuration, we need to write the setting for the database first and then the application build. The configuration of the file can be displayed below:
touch docker-compose.ymlvi docker-compose.yml
mysql:
 image: mysql:5.7.15
 environment:
   MYSQL_ROOT_PASSWORD: root
 ports:
   - 3306:3306
 volumes:
   - ./DB_Scripts.sql:/docker-entrypoint-initdb.d/DB_Scripts.sql

webapp:
 build: ./
 ports:
  - 8888:8080
 links:
   - mysql
Let’s go into bits and pieces of the file. The tabs and spacing also matter the most in YML configuration.
- “mysql:” is the place where the configuration of the database starts.
- “image: mysql:5.7.15” is the image getting pulled from public docker registry.
- “environment:” sets the environment variable in the container. Here we are setting MYSQL_ROOT_PASSWORD as root.
- “volumes:” is the directory or the file which is persistent in the container and the host machine too. Here DB_Scripts.sql is persistent in both places.
- “webapp:” is the consideration for the web application content.
- “build:” is the location from where compose reads the Dockerfile to build. Here we used “./” because our Dockerfile is in the same directory.
- “ports:” exposes the container port to the host machine port. Here we expose container 8080 port to the Host machine 8888 port.
- “links:” sets the dependency of the one container to the other. In our case, webapp is dependent on mysql.
Run Docker Compose
Now the directory will something look like this.
ls -la
To run the compose file, we use the command “docker-compose up“. By doing this we are going to start both our containers and even the dependency will be taken care of.
docker-compose up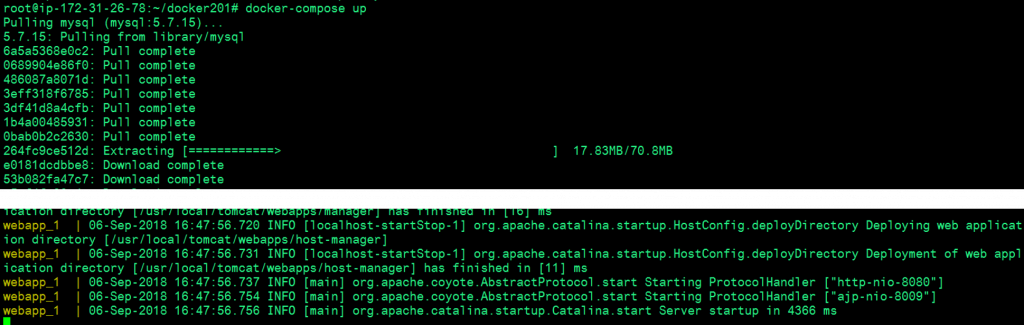
Verifying the application status
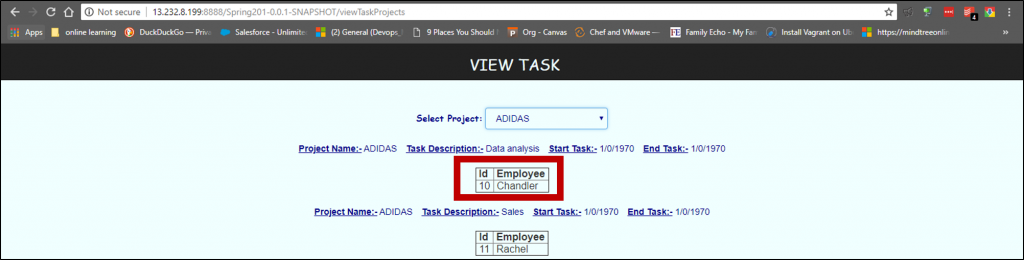
Once our compose file is up. we can check the status of both of our containers by running “docker ps -a”. Now the final moment is to check our application and the database which it carries. To do that, we will open the browser and go to:
http://<public-ip-of-host>:8080/<application-contextpath>What we can see is the application is up and running. We can check the database by clicking on VIEW TASK which will take the data from DB_Scripts.sql and show it to us. And we can see the data available there.

Our website is up and running with the use of Docker-Compose file..!!! We have successfully understood the way of creating docker-compose.yml. The next blog will focus on ensuring data persistence by mounting the data outside the container. To go through it, click here.
Stay tuned for more updates @ linuxnix.com..
Latest posts by Ankesh K (see all)
- Deep-Dive into Jenkins – What are all Jenkins functionalities ? - January 10, 2019
- What are different Maven Plugins and how to build a Maven project? - January 7, 2019
- What is a Maven POM File and what are different Maven Repositories? - January 3, 2019
- What is Maven and what are its benefits? - December 31, 2018
- What are the different ways to install Jenkins ? - December 27, 2018

